Saturday, December 19, 2009

Challah Wreath


Challah
Makes 2 wreaths

Ingredients
  • 1 lb water
  • 2 oz fresh yeast
  • 2 lb 12 oz hi-gluten flour
  • 4 oz sugar
  • .75 oz salt
  • 8 oz eggs
  • 4 oz oil
  1. Mix yeast and water together first, then combine all ingredients together in mixing bowl and mix on low for 12 minutes.
  2. Ferment dough in a warm place for 1 1/2 hours. (Some people put it in the oven with the oven off but the light on.)
  3. Scale the dough into logs.* Each wreath will need 6 logs (3 of each size). So scale six - 6 oz logs, and six - 4 oz logs). Cover with plastic wrap and let rest for 15 minutes.
  4. Once the dough has rested, roll out each log into a long strand. Cover and let rest again for a few minutes then roll once more. The longer the strands the bigger your wreath will be.
  5. Braid 3 pieces of 6 oz strands together, pinching the ends. Do the same for the 4 oz strands.
  6. Egg wash the top of the 6 oz strand braid and place the 4 oz strand braid on top.
  7. Shape into a wreath, place on sheet pan with parchment and egg wash.
  8. Repeat steps 5 - 7 for your second wreath.
  9. Place sheet pan in oven once again with just the light on for about 20 minutes or until dough has proofed.
  10. Egg wash again and then bake for about 30 minutes at 400 degrees F.
*When scaling the logs, if there is enough left over dough you can use it to make a regular 3 braid challah loaf.

-amanda

Friday, December 18, 2009

Day 12: Oatmeal Scotchies


It's the last day of cookies. How sad. :o( For the last cookie, I made something I had never heard of this until this year, and boy are these cookies yummy! Enjoy!


Oatmeal Scotchies
Makes about 4 dozen

Ingredients
  • 1 1/4 cups all-purpose flour
  • 1 teaspoon baking soda
  • 1/2 teaspoon salt
  • 1/2 teaspoon cinnamon
  • 1 cup (2 sticks) butter, softened
  • 3/4 cup sugar
  • 3/4 cup packed brown sugar
  • 2 eggs
  • 1 teaspoon vanilla
  • 3 cups quick or old fashioned oats, uncooked
  • 2 cups butterscotch chips
Preheat oven to 375 degrees F. In a small bowl, combine flour, baking soda, salt and cinnamon.
In a large mixing bowl, cream butter and sugars. Once creamed add eggs and vanilla, mix until combined and creamy. Gradually mix in flour mixture. Stir in oats and butterscotch chips. Drop tablespoonfuls onto cookie sheets lined with parchment. Bake for approximately 10 minutes.

Thanks for joining me for my 12 Days of Cookies!

-amanda

Thursday, December 17, 2009

Day 11: Scotcharoos

Butterscotch and chocolate and peanut butter, oh my! These little yummies won't last long. And of course, my favorite part about them...no baking! Super easy to make. :o)

Scotcharoos (from All Recipes)
Makes 24 bars

Ingredients:
  • 1 cup light corn syrup
  • 1 cup white sugar
  • 1 1/2 cups peanut butter
  • 6 cups crisp rice cereal
  • 1/2 cup butterscotch chips
  • 1/2 cup semisweet chocolate chips
1. Generously butter a 9x13 inch baking pan. Set aside.

2. In a large pot, mix together corn syrup, sugar, and peanut butter. Cook over medium heat, stirring until peanut butter melts. Bring mixture to a boil. Remove from heat, and stir in crisp rice cereal.


3. Transfer mixture into a well buttered 9x13 inch pan. With your hands well buttered, pat it down into pan.


4. In a medium saucepan, over medium low heat, melt chocolate chips and butterscotch chips until smooth. Spread over top of bars and let bars cool. Cut into squares.

-amanda

Wednesday, December 16, 2009

Day 10: Thin Mints

I think you will either love or hate these crackers. I had a lot of people who love thin mint cookies, say these tasted almost just like them, and they loved them! Other people just didn't the idea of a chocolate on a cracker. I really enjoyed them, and I hope you will too!

Thin Mints
Makes 80

Ingredients
  • 1 pound bittersweet chocolate
  • 80 Ritz crackers
  • 1/2 teaspoon peppermint extract
  1. Melt chocolate using a double boiler or the microwave. (Do not overheat or get water into the chocolate)
  2. Once chocolate is melted, stir in a couple drops of peppermint flavor into the chocolate.
  3. Dip crackers into the melted chocolate and then place onto a cold cookie sheet and put into the refrigerator to set. (The cold sheet tray will keep the bottoms neat.)
  4. After a few minutes take them out and package them up.
If you'd like to add sprinkles or crushed peppermint, do so after dipping and before refrigerating.

-amanda

Tuesday, December 15, 2009

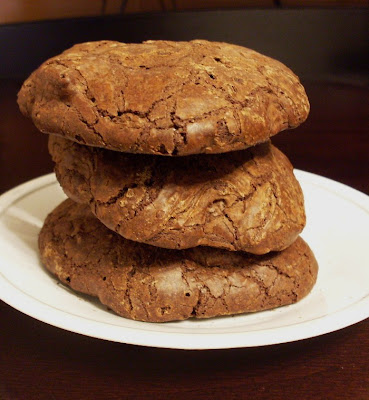
Day 9: Mudslides


If you love chocolate then these cookies are for you! You must have a scale to measure out the ingredients for this cookie. Sorry I don't have any other measurements.

Mudslides
Makes about 1 dozen large cookies

Ingredients
  • 4 oz unsweetened chocolate
  • 12 oz bittersweet chocolate
  • 2 oz butter
  • 4 eggs
  • 12 oz sugar
  • .5 oz coffee extract
  • 1 1/2 tsp vanilla
  • 2 oz cake flour (or all-purpose if you don't have cake)
  • 1/3 tsp (or a little more than a 1/4tsp) baking powder
  • very small pinch of salt
  • 14 oz chocolate chips, frozen
  • 2 oz walnuts, chopped and frozen
  1. Preheat oven to 350 degrees F.
  2. Soft together the flour, baking power, and salt.
  3. Melt the unsweetened chocolate, bittersweet chocolate and butter over a double boiler. Once melted remove from heat.
  4. Quickly whip the eggs, sugar, extract, and vanilla together.
  5. Slowly fold the egg mixture into the chocolate mixture continuously stirring.
  6. Fold the sifted ingredients into the mixture.
  7. Finally quickly add the frozen chocolate chips and walnuts.
  8. Use a large or small cookie scoop depending on what size cookies you want.
  9. Bake for about 15 minutes.
Batter will be very wet and liquid at first. If it is too liquid to hold any shape wait a minute or two before scooping, but don't wait too long because then the batter will get too hard to scoop.

-amanda

Monday, December 14, 2009

Day 8: Snowballs

The classic snowball nut cookie. If you are a nut lover you may want to double the nuts in this recipe.

Snowballs
Makes 2 dozen.

Ingredients
  • 1 cup butter
  • 1/2 cup powdered sugar
  • 1 teaspoon vanilla
  • 2 1/4 cups flour
  • 1/4 teaspoon salt
  • 1/2 cup chopped pecans
  1. Cream together butter and sugar, then mix in vanilla and salt.
  2. Gradually add flour to mixture and then chopped pecans. Mix until well combined.
  3. Chill dough for 1 hour.
  4. Preheat oven to 400 degrees.
  5. Roll dough into 1 inch balls, and place on baking sheets.
  6. Bake for 10 -15 minutes. Once they are light brown on the bottom they are done.
  7. Cool for about 5 minutes, and then roll in powdered sugar.
-amanda

Sunday, December 13, 2009

Day 7: Eggnog Thumbprints


These don't really have an eggnog taste in my opinion but other people thought so. Either way they are pretty good. :o)

Eggnog Thumbprints (from Allrecipes)
Makes 48

Ingredients
  • 3/4 cup butter, softened
  • 1/2 cup white sugar
  • 1/4 cup packed brown sugar
  • 1 egg
  • 1/2 teaspoon vanilla extract
  • 2 cups all-purpose flour
  • 1/4 teaspoon salt
  • 1/4 cup butter
  • 1 cup confectioners' sugar
  • 1 tablespoon rum
  • 1 pinch ground nutmeg
  1. Preheat the oven to 350 degrees F (175 degrees C).
  2. In a medium bowl, cream together 3/4 cup butter, white sugar, and brown sugar until smooth. Beat in egg and vanilla. Combine flour and salt; stir into the creamed mixture by hand to form a soft dough. Roll dough into 1 inch balls, and place balls 2 inches apart on ungreased cookie sheets. Make an indention in the center of each cookie using your finger or thumb.
  3. Bake for 12 minutes in preheated oven. Cool completely.
  4. In a small bowl, mix together 1/4 cup butter, confectioners' sugar, and rum. Spoon rounded teaspoonfuls of filling onto cookies. Sprinkle with nutmeg. Let stand until set before storing in an airtight container.
-amanda

Saturday, December 12, 2009

Day 6: White Chocolate Cherry Chunkies


This is my new favorite cookie. They are amazing! You must try these. Enough said.

White Chocolate Cherry Chunkies (adapted from Food Network)
Makes 4 dozen

Ingredients:
  • 1 stick butter, softened
  • 1 cup packed brown sugar
  • 1 cup granulated sugar
  • 2 large eggs
  • 1 teaspoon vanilla extract
  • 3 cups all-purpose flour
  • 1 teaspoon baking soda
  • 1/2 teaspoon salt
  • 2 tablespoons milk
  • 1 cup candied cherries (chopped in half or quarters depending on size)
  • 1 1/2 cups white chocolate chips
  1. Preheat oven to 375 degrees F.
  2. In a medium bowl, with electric mixer, cream butter and sugars together until light and fluffy. Add eggs and vanilla and beat until just combined. Set aside.
  3. Sift together flour, soda, and salt. Add milk to the butter mixture and then add the flour mixture. Mix until just combined. Batter should be stiff.
  4. In another bowl, combine cherries, and white chocolate. Then add to batter, stirring only to blend. Drop by heaping tablespoons onto a greased cookie sheet, 2 inches apart. Bake for approximately 11 to 13 minutes. Cool on wire rack.

-amanda

Friday, December 11, 2009

Day 5: Buckeyes


Buckeyes (from Allrecipes)
Makes 24

Ingredients
  • 1 1/2 cups creamy peanut butter
  • 1/2 cup butter, softened
  • 1 teaspoon vanilla extract
  • 4 cups sifted confectioners' sugar
  • 6 ounces semi-sweet chocolate chips
  • 2 tablespoons shortening
  1. Line a baking sheet with waxed paper; set aside.
  2. In a medium bowl, mix peanut butter, butter, vanilla, and confectioners' sugar with hands to form a smooth stiff dough. Shape into balls using 2 teaspoons of dough for each ball. Place on prepared pan, and refrigerate.
  3. Melt shortening and chocolate together in a metal bowl over a pan of lightly simmering water. Stir occasionally until smooth, and remove from heat.
  4. Remove balls from refrigerator. Insert a wooden toothpick into a ball, and dip into melted chocolate. Return to wax paper, chocolate side down, and remove toothpick. Repeat with remaining balls. Refrigerate for 30 minutes to set.

-amanda

Thursday, December 10, 2009

Day 4: Chocolate Toffee Crunchies


These are very good and people loved them! It is almost like a Heath bar, but more crispy. And they are soooo easy and fast to make.

Chocolate Toffee Crunchies (from Allrecipes)

Ingredients
  • 2 cups vanilla wafer crumbs
  • 1/4 cup packed brown sugar
  • 1/2 cup butter (no substitutes), melted
Topping:
  • 1/2 cup butter (no substitutes)
  • 1/2 cup packed brown sugar
  • 1 cup semisweet chocolate chips
  • 1/2 cup finely chopped pecans
  1. Combine crumbs, brown sugar and butter. Press into an ungreased 13-in. x 9-in. x 2-in. baking pan. Bake at 350 degrees for 8-10 minutes or until lightly browned.
  2. In a saucepan, bring butter and brown sugar to a boil over medium heat; boil and stir for 1 minute. Pour evenly over crust. Bake at 350 degrees for 10 minutes.
  3. Remove from oven and let stand for 2 minutes. Sprinkle with chocolate chips; let stand until chocolate is melted. Spread evenly over top; sprinkle with chopped pecans. Cool completely before cutting.
-amanda

Wednesday, December 9, 2009

Day 3: Candy Cane Cookies


When I found these cookies online I thought they were so adorable and I couldn't wait to make them!

Candy Cane Cookies (from Food Network)
Makes 25

Ingredients:
  • 1 box sugar cookie mix
  • 1/2 stick butter, melted
  • 1 egg
  • 1/3 cup cream cheese, softened
  • 1/2 cup all-purpose flour, plus additional for surface
  • Red food coloring
  • 1 1/2 teaspoons peppermint extract (optional)

1. Preheat oven to 325 degrees F.

2. In a bowl, combine sugar cookie mix, melted butter, egg, cream cheese, and flour; mix together to form dough. Separate dough into 2 equal portions and place in 2 different bowls. Add red food coloring gradually to 1 bowl of dough, kneading together until desired shade of red is created. To second bowl of uncolored dough, add peppermint extract and knead together.

3. On a floured work surface, shape each dough into balls and then roll each ball into 1/4-inch-wide ropes, each about 6 inches long. For each cookie, carefully twist some of the red and white ropes of dough together and shape into a candy cane. Spread candy canes out on cookie sheets and bake on the top shelf of the oven for about 10 to 12 minutes. Transfer to a rack to cool before serving.


Tips: Unless you are a huge peppermint fan I wouldn't add the peppermint. Only my dad enjoyed the peppermint taste of these cookies, everyone else would have preferred a regular sugar cookie. Also these were very difficult to twist together because they kept falling apart. So I ended up making some round "peppermints" with the rest of the dough. To make the peppermints in the picture below, just take a couple pieces of each dough and roll into a ball and press flat before baking.


-amanda

Tuesday, December 8, 2009

Day 2: Butterscotch Drops

These were super easy and fast to make and were a huge hit with everyone! These are definitely tasty and if you haven't made them you should give them a try!


Butterscotch Drops (adapted from Allrecipes)
Makes 24

Ingredients
  • 1 (11 ounce) package butterscotch chips
  • 1 cup creamy peanut butter
  • 4 cups cornflakes cereal
  • 1 cup melted chocolate, to drizzle over top (optional)
In a medium saucepan over medium heat, melt butterscotch chips and peanut butter together. Remove from stove and stir in cornflakes. Drop by spoonfuls onto cookie sheets. Chill to harden. Drizzle chocolate over top and chill again. Place in baking cups for serving.

All packed up and ready to go!

-amanda

Monday, December 7, 2009

Day 1: Pumpkin Cookies

Welcome to Day 1 of 12 days of Cookies!

These pumpkin cookies are nice and soft with a delicious pumpkin flavor, and the easy to make glaze adds just the right amount of sweetness!

Pumpkin Cookies
Makes 36 cookies

Ingredients
  • 2 1/2 cups all-purpose flour
  • 1 teaspoon baking soda
  • 1 teaspoon baking powder
  • 1 teaspoon ground cinnamon
  • 1/2 teaspoon ground nutmeg
  • 1/2 teaspoon salt
  • 1 1/2 cups granulated sugar
  • 1/2 cup butter (1 stick), softened
  • 1 cup pumpkin puree
  • 1 large egg
  • 1 teaspoon vanilla extract
  • 1/2 cup of walnuts (optional)
  1. Preheat oven to 350° F. Grease baking sheets or line with parchment or wax paper.
  2. Combine flour, baking soda, baking powder, cinnamon, nutmeg and salt in medium bowl. Beat sugar and butter in large mixing bowl until well blended. Beat in pumpkin, egg and vanilla extract until smooth. Gradually beat in flour mixture. Drop rounded tablespoon sized balls onto prepared baking sheets.
  3. Bake for 15 to 18 minutes or until edges are firm. Cool on baking sheets for 2 minutes; remove to wire racks to cool completely. Drizzle Glaze over cookies (recipe for glaze below).
Glaze:
2 cups sifted powdered sugar, 3 tablespoons milk, 1 tablespoon melted butter and 1 teaspoon vanilla extract in small bowl until smooth.


-amanda

Monday, November 30, 2009

12 Days of Cookies


Starting December 7th, I will be posting a different cookie for twelve days! Whether you're baking this holiday season for a cookie exchange, a party, or for gifts, hopefully this will give you some inspiration! So check back for plenty of goodies!!

-amanda

Thursday, November 26, 2009

Time to Give Thanks


Happy Thanksgiving everyone!

Today is a day to give thanks for what we are grateful for.

Today (and everyday) I am grateful for:
  • Life
  • Love
  • My wonderful family and friends
  • That everyone I love is safe, happy and healthy
  • The roof over my head, the food on the table and the clothes on my back
  • Yesterday, today, tomorrow and all the days to come
I hope you all have a wonderful day spending time with the ones who mean the most to you, and filling up on delicious Thanksgiving yummies!

_______________________________________________

I had to make a bread centerpiece for my baking class and this is what I chose to do.
It turned out much better than I thought it would. :o)

The before and after baking photos.

We were not allowed to use food color, so I used coffee extract, and red pepper to color the dough. Unfortunately you lose a lot of color during baking. The breads that I used were challah without yeast and a decorating dough and I used sesame seeds to give the turkey some texture.

-amanda

Tuesday, November 24, 2009

Snickerdoodles Made with Love


Today is November 24th, which just happens to be my favorite day, ummm....ever. :o)
Why you ask?

Today my boyfriend and I celebrate our 7th anniversary and I couldn't be happier. He is an amazing boyfriend and best friend and I am grateful for everyday that he has been in my life. (I love you!!!)


To celebrate, I made his favorite cookies...Snickerdoodles! Now, Snickerdoodles are a little too plain for my taste (I would prefer, double fudge chocolate or something, lol) but they are perfect for him and I actually enjoy this recipe quite a bit. They have a nice little crisp edge and a soft center which I love. There is nothing I hate more than a crunchy cookie! Ewww.

Snickerdoodles (from Allrecipes)
*Makes approximately 12 cookies
  • 1/4 cup butter, softened
  • 1/4 cup shortening
  • 3/4 cup white sugar
  • 1 egg
  • 1 teaspoon vanilla extract
  • 1-1/3 cups and 1 tablespoon all-purpose flour
  • 1 teaspoon cream of tartar
  • 1/2 teaspoon baking soda
  • 1/8 teaspoon salt
  • 1 tablespoon white sugar
  • 1 teaspoon ground cinnamon
  1. Preheat oven to 400 degrees F (200 degrees C).
  2. Cream together butter, shortening, 3/4 cups sugar, the egg and the vanilla. Blend in the flour, cream of tartar, soda and salt. Shape dough by rounded spoonfuls into balls.
  3. Mix the 1 tablespoon sugar and the cinnamon. Roll balls of dough in mixture. Place 2 inches apart on baking sheets lined with parchment.
  4. Bake 8 minutes. Let sit on baking sheet for another 2 - 3 minutes before removing from baking sheets and placing on racks to cool.

When you take them out of the oven the edges should be golden brown and the tops should have cracks and seem gooey in between and very soft. Letting them sit on the baking sheets will cook them further without over cooking them.

*The recipe above was altered, and was supposed to make 24 cookies, but it actually made 12. The original recipe states it will make 48 cookies but I am thinking not.

Enjoy!


-amanda

P.S. I apologize for being MIA, but this semester is almost over and I have quite a few yummy things planned for the holidays! :o)

Tuesday, November 3, 2009

pumpkin icebox pie

This is a nice fall dessert, that is very tasty! Like pumpkin pie but a little sweeter in my opinion. I didn't have a 9-in square pan, so I used my 10-inch and just crushed up some extra graham crackers and melted a little more butter and it filled up the whole pan.


Pumpkin Icebox Pie (from Everyday Food)
Serves 9-12

Crust:
  • 16 cinnamon graham crackers, crushed
  • 1 tablespoon dark-brown sugar
  • 1/2 teaspoon salt
  • 1/2 cup (1 stick) unsalted butter, melted and cooled
Filling:
  • 3 teaspoons unflavored powdered gelatin
  • 1 can (29 ounces) pure pumpkin puree
  • 4 ounces cream cheese, room temperature
  • 1 can (12 ounces) evaporated milk
  • 1 cup packed dark-brown sugar
  • 1 teaspoon ground cinnamon
  • 1/4 teaspoon ground nutmeg
  • 3/4 teaspoon salt

Make crust
  1. Preheat oven to 325 degrees.
  2. In a bowl combine crushed graham crackers, sugar, salt and butter. Mix until it resembles a wet sand. Press crumbs in the bottom and up the sides of a 9-inch square baking dish.
  3. Bake until crust is deep golden brown and fragrant, 15 to 20 minutes. Let cool completely in baking dish on a wire rack.

While crust is baking, make the filling
  1. Place 1/4 cup cold water in a small bowl. Sprinkle gelatin on top of water and let stand 5 minutes.
  2. In a large bowl, whisk together pumpkin puree and cream cheese until smooth.
  3. In a small saucepan, combine evaporated milk, brown sugar, cinnamon, nutmeg, and salt; bring to a simmer over medium. Add gelatin mixture and stir until completely dissolved.
  4. Pour milk mixture into pumpkin mixture and whisk until completely smooth.

To finish
  1. Pour filling into cooled crust and refrigerate until chilled and completely set, about 3 hours (or wrap tightly with plastic and refrigerate for up to 2 days).
  2. To serve, top with whipped cream and sprinkle with nutmeg.

-amanda

Sunday, November 1, 2009

Golf Bag Cake

Happy Birthday to my golf lovin' man. :o)


On my way to deliver the cake I realized two things:
  1. I forgot the candles I bought (I always forget the candles, so I have boatloads of different candles...sparkling ones, wavy ones, black and white polka dots ones, and blue ones for the BF. *sigh*)
  2. It looks like he's turning 31...crap! I didn't even think to put his age on the clubs. And that just happened to be the one thing that everyone commented on! Oh well. :o)
-amanda

Tuesday, October 20, 2009

Chocolate Kitty Jack-O-Lantern

This is a centerpiece I made in school (sorry about the photo quality, I only had my phone).

To make a hollow pumpkin (egg, ball, etc.) of your own follow these directions.
  • Blow up a balloon to desired size and grease.
  • Temper chocolate and dip balloon in chocolate covering all but the top
  • Let the chocolate dry (you can set the balloon on a plate but might want to tie a string to the top and attach to something else so the balloon won't fall over)
  • Once chocolate is hard, dip again in tempered chocolate and set to dry. (Do this procees a total of 3-4 times to get a thick enough shell, so that it won't break when you carve into it)
  • Once the final layer is completely dry you can pop the balloon. Depending on how well you greased the balloon, it may or may not come out.
To decorate use cookie cutters or an exacto knife. Heat the knife tip or edge of cutter over a heat gun. Careful not to burn the metal or yourself! Slowly and with little pressure insert into the chocolate to carve desired design. You will need to keep re-heating your tools while you are carving. To add other pieces of chocolate, use tempered chocolate as "glue".

Have fun!

-amanda

Sunday, October 4, 2009

Dessert Table: Baby/Wedding Combo

I have been dying to make a dessert table for months now, but never had a reason to do one until now. One of my co-workers is getting married next week, and the other who happens to be her cousin is having a baby girl in November. So we decided at work to throw them a little surprise wedding/baby shower. I figured this would be the perfect event for my first dessert table. It was so much fun to do, I hope I can do more in the future!


Details:


-amanda

Tuesday, September 22, 2009

Chocolate Bow

My first day working with chocolate at school we made bows! It was a very lengthy process mainly because chocolate is hard to work with because you have to keep it in temper. If you are unfamiliar with working with chocolate and how to temper here are some helpful instructions: Tempering Chocolate.

One thing I want to stress is to make sure that you don't get any water in your chocolate, or it is ruined. This includes steam, so if you are using a double boiler with your chocolate, make sure the bowl fits over your pot correctly so no steam can roll into the bowl. You also have to be careful when using a double boiler that you don't burn your chocolate. I prefer to pour the hot water into a bowl and use that instead of a pot over direct heat. It may take a little longer to melt, but there is less stress of burning and not as much steam to worry about.

I don't have my notes with me on how to make the bow, and I don't really know how helpful they would be without step-by-step pictures. However, if you really want my notes, let me know and I can send them to you.

-amanda

Blueberry Ice Cream

This blueberry ice cream was fun to make and tasted good, but a little too tangy for my taste. But still a nice refreshing treat. (I forgot to save some blueberries for garnish, oops! So sorry about the not so exciting picture!)

Blueberry Ice Cream
(from Noble Pig)
  • 1 cup blueberries (fresh or frozen, if frozen, thaw and drain)
  • 1/3 cup sugar, or more to taste
  • Pinch of salt
  • Zest of one lime
  • Juice of 1/2 a lime, or more juice to taste
  • 3/4 cup heavy cream
  • 3/4 cup sour cream

In a medium saucepan cook blueberries, sugar, salt, lime zest and juice over medium heat, stirring until mixture boils and the berries pop and soften, about 4 minutes.

Pour the berry mixture into a blender and whirl until a puree is achieved, about 1 minute. The mixture will not be completely smooth. Add the heavy cream and sour cream and pulse to blend. Taste and add a bit more lime juice or sugar if you choose.

Pour the blend into a bowl and refrigerate until it is chilled before churning into ice cream.


Tip: If you don't like blueberry skin, after blending the blueberries try to put the mixture through a sieve to get rid of skin, and then finish adding the creams.

-amanda

Thursday, September 10, 2009

Dirt and Worms!

Dirt and worms brings me back to the third grade when kids brought in treats for their birthday. It was the first time I ever had dirt and worms, and I believe the last. Until now! My friend at work has been talking about dirt and worms for awhile, so I made it for her birthday. And it was so yummy!!! The best part is, it only took minutes to make! It's a nice quick treat and fun for kids (and adults too...ahem).

Dirt and Worms
Makes about 10 - 7oz cups
  • 2 cups cold milk
  • 1 pkg. (4-serving size) Jello-O chocolate instant pudding
  • 1 tub (8 oz.) Cool Whip whipped topping, thawed
  • 20 Oreo Cookies, finely crushed, divided (I take out the creme)
  • Gummy Worms (plain or sour)
Pour the milk into a large bowl and add the pudding mix. Beat with a whisk until well blended, about 2 minutes. Let stand for 5 minutes. Mix in the Cool Whip and half of the Oreo crumbs.

Pour into cups or container of your choice and top with remaining Oreo crumbs (you can always crush up some more Oreos if want more dirt on top). Refrigerate for at least 1 hour, and add gummy worms before serving.

-amanda

Wednesday, September 9, 2009

Classic Creme Brulee

Creme brulee...my boyfriend's true love. ;o)

It is the only dessert that he really likes. In fact, he likes it so much that he makes it himself, and I just assist him. :o) Personally, creme brulee is not my favorite dessert because it lacks something that I find to be a necessary ingredient in a delightful dessert.....Chocolate! I do suppose you could make some sort of chocolate creme brulee, but so far all we have had is your basic creme brulee with fruit. Enjoy!

1 cup heavy cream
2 Tbs. plus additional 1/3 cup sugar
2 extra large or jumbo egg yolks
½ tsp. vanilla extract

•Preheat oven to 300ºF. Prepare some boiling water.
•In a saucepan over medium heat, combine cream and 2 Tbs sugar; cook, stirring occasionally until small bubbles appear around edges of pan, 5-6 minutes. Set aside.
•In a bowl, beat egg yolks and vanilla until smooth and light. Pour hot cream mixture into egg yolks, a little at a time, beating continuously until well blended. Strain mixture through a fine sieve into a bowl. Divide mixture among four 4 oz. ramekins.
•Arrange ramekins in a baking pan and place on middle shelf of preheated oven. Fill pan with boiling water to halfway up sides of ramekins. Cover pan loosely with aluminum foil. Bake until custard is just set, about 25 minutes (use caution when removing ramekins from oven as they will be very hot!). Chill 2-3 hours.
•Sprinkle remaining sugar evenly over top of cooled custards. With the kitchen torch, move the flame continuously over the surface of the ramekins, in a circular motion until sugar melts and becomes golden brown and bubbly. Serve immediately surrounded by fresh fruit or refrigerate for later use (if saving for later use, wait to torch the sugar until ready to serve).

Thanks B for all the hard work and help with this one!

-amanda

Monday, August 31, 2009

New Layout and Giveaway!

Sorry I have been MIA for so long. I have been out of town a lot and started baking and pastry school which keeps me quite busy along with work. Over the next couple months I will be posting some different things I make in school. So be sure to check back!

Now onto the fun stuff! How do you like the new layout? That's me as a cartoon! :o) Fun huh? Well, I told you I would be doing a giveaway when I got my new layout. So here it is!

If you win you will receive:
2 potholders, 1 oven mitt, and 1 kitchen towel,
all with a cute cupcake/flower pattern!
  • You must follow my blog to be eligible.
  • And just so I know you're still out there, leave a comment on this post about what you think of my new layout, ideas of new desserts I should make, or whatever you want!
  • Make sure to leave a way for me to contact you if you win!
  • Winner will be picked by random.org.
  • Deadline for post is Friday, September 11th @ 5pm.
Good Luck!

And the winner is....Kim from Stirring the Pot! Congratulations!


-amanda

Wednesday, August 19, 2009

Rocky Road Ice Cream

I have a friend who is pregnant and craves ice cream. Since I got my new ice cream maker she was really hoping that I would make her favorite, rocky road. I was a little resistant to wanting to make it, because I have never had it and I'm not a big fan of marshmallows. However, I think she and baby deserve some yummy rocky road. :o) And this is a good opportunity for me to try something new!
Rocky Road Ice Cream (from Serving Ice Cream)
Makes 10 half cup servings
  • 1 cup milk
  • 1/2 cup granulated sugar
  • 1 1/3 cup semi-sweet chocolate (8 oz)
  • 2 cups heavy cream
  • 1 tsp vanilla extract
  • 1/2 cup chopped almonds
  • 1/4 cup chocolate chips
  • 3/4 cup mini marshmallows (place in freezer before making the ice cream so they are easier to stir in at the end)
On your stove or in your microwave, heat milk until it just starts to bubble. While the milk is heating, finely chop chocolate in a food processor or blender. Remove milk from heat and add chocolate and sugar, mix until chocolate completely melts and the mixture is smooth.

Cool in refrigerator for at least 15 minutes. Once cool, stir in heavy cream and vanilla. Chill in fridge for at least 30 minutes.

Pour mixture into ice cream maker and mix about 20 minutes or according to manufacturer's instructions.

Add chopped nuts and chocolate chunks and mix for an additional 5 minutes.

Remove from ice cream maker, stir in frozen marshmallows, and place in a storage container.

And enjoy! It was better than I thought, but I still am not a fan of the marshmallows. Hopefully my friend will enjoy it!

___________________________________________________

For those of you who are new or haven't heard about the giveaway, I plan on doing a giveaway soon. The only thing you need to do to be eligible for the giveaway is to follow my blog. You can do so by clicking the follow button in the sidebar to the right.

I apologize for not having done the giveaway yet. I wanted to do it with the launch of my new blog layout and I am still waiting to get the new layout. Hopefully it will be soon!

I just wanted you to know that I haven't forgotten and I promise it's coming!

In the meantime, thanks to all of you that are following my blog and even those who aren't. I really appreciate all of the visitors and the comments/feedback that you leave!

Thanks again :o)

-amanda

Chocolate Oatmeal Cookies

These no-bake cookies have been a favorite in my family since I was little. We like them so much they are usually gone in one day. I made them today for my brother's birthday, because it is one of the few sweets that he likes. Personally, I am not a big fan of oatmeal cookies, but I love these!

Chocolate Oatmeal Cookies
Makes about 18
  • 3 tablespoons cocoa powder
  • 4 tablespoons butter
  • 1/2 cup milk
  • 2 cups sugar
  • 1 teaspoon vanilla
  • 3 tablespoons peanut butter
  • 3 cups Quaker Oats Quick Oats (you MUST use the quick oats or the cookies won't turn out)
Set out some wax or parchment paper on the counter before beginning.

In a large pot combine cocoa powder, butter, milk and sugar. Bring to a boil and boil for 1 minute. Remove from heat. Add vanilla and peanut butter, stir until peanut butter is melted. Pour in oats and mix quickly until all the oats are covered with the chocolate.

Use an ice cream scoop to scoop some of the mixture onto the wax paper and pat down with the back of the scooper to make the cookies flat. Do this quickly as the mixture starts to harden quite fast once the oats are added.

Tip: I suggest measuring out your peanut butter and oats ahead of time so the chocolate will be at the right temperature when you add them.

Let cookies set for about 10-15 minutes or until firm and you are able to pick them up without them bending.

Finally, eat 'em up! Because they are gooooood!

-amanda

Friday, August 14, 2009

Brownie Ice Cream


For my birthday this year my friend got me a Cuisinart ice cream maker! I was thrilled! I attempted the basic vanilla ice cream recipe that came with the maker for my first batch and decided why not add some brownies, since I have a ton left over from the Cheesecake Brownies I made. So I threw some of those in the mix and the ice cream is delicious! Also, it was SO easy to make! I can't wait to make something else with my new ice cream maker.

That thing is amazing and I am so happy that I have one now! If you don't have one...you seriously need to get one. They are more affordable than I thought, only $49.95 on Amazon and free shipping! I really like that the freezer bowl is small enough to fit in my tiny freezer that is always packed with food. And did I tell you all you have to do is turn on the machine, add the ingredients and it does all the work for you in about 25 minutes? A-ma-zzzing! Sorry, I am just really excited about my new toy. :oD Anyways, here is the recipe:

Brownie Ice Cream
Makes 10 half cup servings.
  • 1 cup whole milk, chilled
  • 3/4 cup granulated sugar
  • 2 cups heavy cream, chilled
  • 1-2 teaspoons pure vanilla extract, to taste (I used 2 and would probably cut it back next time because it had a very strong vanilla taste)
  • 1 cup chopped brownies

In a medium bowl, use a whisk to combine the milk and sugar until the sugar is dissolved, about 2 minutes. Stir in the heavy cream and vanilla. Turn on your ice cream maker and pour the ingredients in. Let mix 25 minutes or until thickened. Add the chopped brownies in the last five minutes of mixing or just mix them in by hand with a rubber spatula once the ice cream maker is done and turned off. Unless you like your ice cream soft and creamy, place it in a freezer safe container and freeze for at least 2 hours to get it thickened properly.

Now go get your ice cream makers out and get started! Because it's hot out there, and this is delightfully refreshing on a hot summer day. :o)


-amanda

Wednesday, August 12, 2009

Cheesecake Brownies

My favorite parts of dessert usually involve two ingredients: cream cheese (which honestly I have no problem eating by itself, except for the fact that it's not such a healthy idea), and chocolate. When I came across cheesecake brownies, I thought it was one of the best ideas ever! It was one of the first recipes I found when I first discovered foodie blogs, and I have been wanting to make it ever since. I decided today was the day so here they are! They are very rich, but oh so good!


Cheesecake Brownies (Recipe from My Baking Addiction)
Makes 32 brownies

Ingredients
Brownie Batter:

  • 2 Sticks unsalted butter, cut into pieces
  • 5 ounces unsweetened chocolate, chopped
  • 2 cups superfine sugar*
  • 2 large eggs
  • 1 tsp pure vanilla extract
  • 1 pinch salt
  • 1 1/3 cup all purpose flour
  • 1 tsp baking powder
Cheesecake Batter:
  • 2 (8 ounce) packages cream cheese; softened
  • 2/3 cup superfine sugar*
  • 2 large egg yolks
  • 1/2 tsp pure vanilla extract
1. Put an oven rack in the middle of the oven and preheat oven to 350° F.
2. Grease a 9x13 inch baking pan with butter.
3. Heat butter and chocolate in a saucepan over moderately low heat, whisking occasionally, just until melted, or just melt in the microwave.
4. Remove from heat, pour into a big bowl and whisk in sugar, eggs, vanilla, and a pinch of salt until well combined and shiny.
5. Whisk in flour and baking powder until just combined and spread in baking pan.
6. Next, whisk together the cheesecake batter ingredients in a small bowl until smooth.
7. Dollop over brownie batter, then swirl in with a knife or spatula. (I forgot to dollop and smoothed mine evenly in the pan, so there isn't much swirl going on, but still delicious!)
8. Bake until the edges are slightly puffed and center is just set, about 45 minutes.
9. Let cool.
*Note- If you do not have superfine sugar, just throw some granulated sugar in the food processor for a few seconds.


-amanda

Monday, August 10, 2009

Coco Bello

Picture it:

You're laying in a lounge chair underneath the warm sun and you can hear the waves crash onto the beach. You feel the breeze from the water and it keeps you nice and cool so you can tan for hours and hours comfortably. You're in paradise and you think it doesn't get better than this. And then you hear, "Coco bell-ooooo!" and you jump up!
Yes! the coconut guy has arrived with his bucket of delicious and refreshing Coco Bello, the perfect snack for the beach. You grab 1 euro and run over to get your little piece of heaven. Who knew coconut could be so wonderful?


This was my experience every time we went to Sottomarina Beach in Italy. It was about an hour and twenty minutes from where we lived, which was a treat for us since we don't live close to a beach in the States. We traveled there often and I always looked forward to the Coco Bello guy and the granita vendor that rolled down the beach. I recently bought a coconut to enjoy and bring me back to those wonderful lazy days in Italy. Needless to say, it wasn't nearly as good as I remember.


Ciao,
-amanda

Wednesday, August 5, 2009

Pineapple Cheesecake


My mom made me this delicious cheesecake for my birthday. She got the recipe from my great grandma, and we're not sure if it was her own or if she got it from somewhere else. But if you like like pineapple and you like cheesecake, you will definitely enjoy this.

Pineapple Cheesecake
Makes 8 servings.

Crust:
  • 1 1/4 c graham cracker crumbs
  • 1/3 c sugar (omit sugar if using Honey Maid graham cracker crumbs)
  • 1/3 c melted butter
Combine ingredients together and then reserve 1/4 of the mixture for the top of the cheesecake. Press remaining mixture into bottom and sides of 8 inch pie pan.

Filling:
  • 1 pkg (8 oz) cream cheese, softened
  • 2 tbsp butter, softened
  • 1/2 c sugar
  • 1 egg
  • 2 tbsp flour
  • 2/3 c milk
  • 1 can (9 oz) crushed pineapple, including juice
Blend together the cream cheese and butter until well mixed, and then add the sugar and egg. Mix thoroughly, then blend the remaining ingredients in the order listed: flour, milk, pineapple.

Pour the mixture into the prepared pie pan and spread evenly. Top cheesecake with reserved crumb mixture. Bake for 35 minutes at 350° F. Chill before serving.

-amanda